Shower plumbing involves more components than most homeowners realize before they start a bathroom renovation. Whether you’re roughing in shower drain plumbing for a new bathroom, replacing plumbing trim in an existing shower, or planning a DIY outdoor shower plumbing project in your backyard, each phase of plumbing shower work requires specific materials, measurements, and code awareness.
This guide walks through the key elements of shower plumbing—from drain placement to valve trim selection—and includes practical guidance for outdoor shower builds.
Shower drain plumbing basics
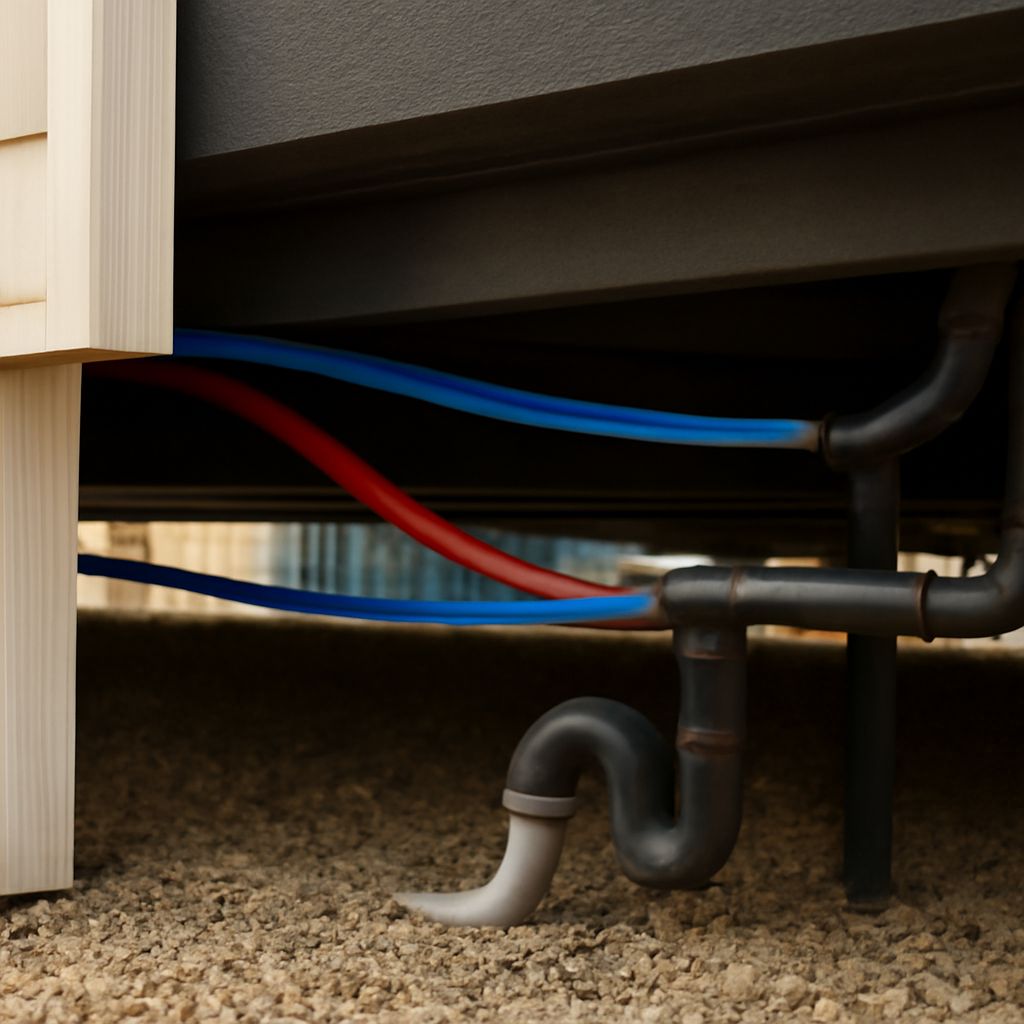
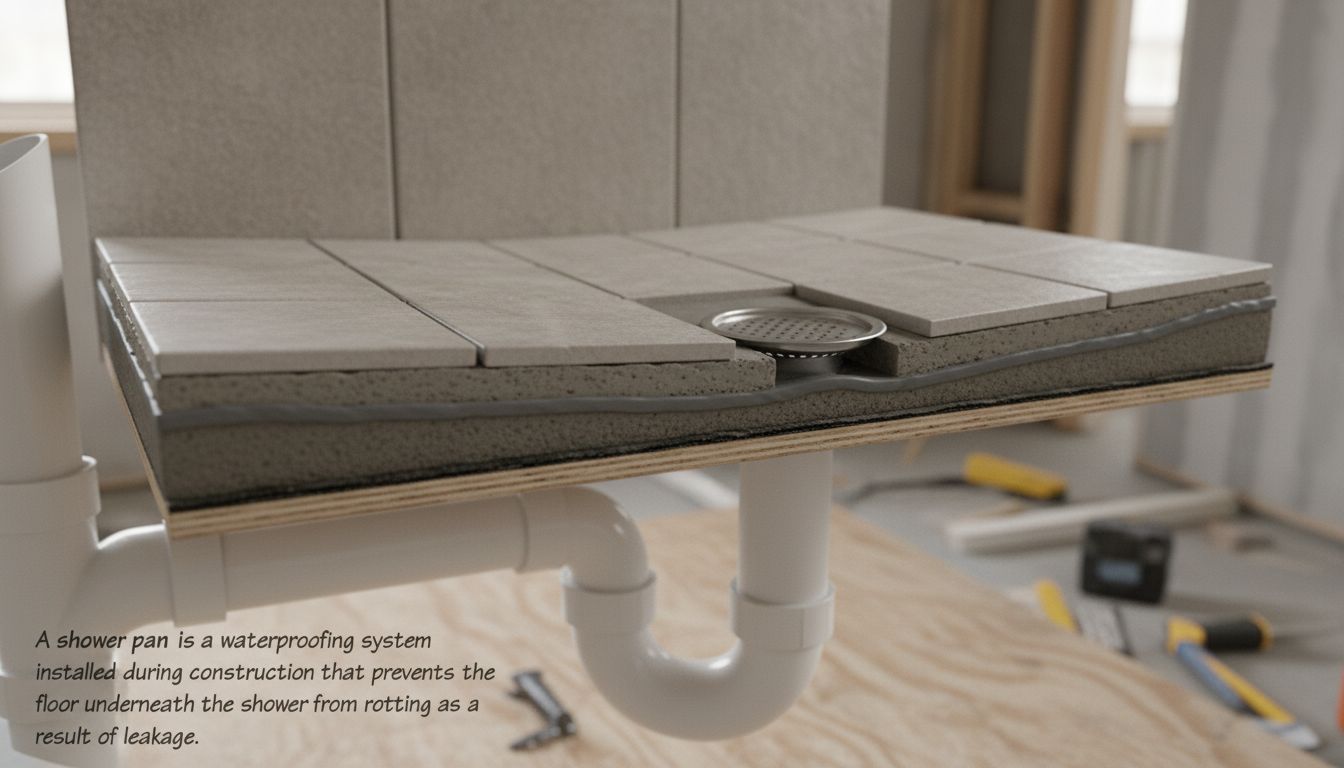
Shower drain plumbing begins at the drain body, which connects to the P-trap and then to the drain-waste-vent (DWV) system. For a standard shower pan, the drain body sits at the floor of the shower and must be set at the correct height—flush with the finished floor surface, accounting for the tile and mortar bed thickness.
A typical residential shower uses a 2-inch drain, which handles the maximum flow rate of a standard showerhead with no backup risk. Some luxury showers with multiple body sprays or rain heads may require a 3-inch drain to handle higher flow volumes. The P-trap connects below the floor structure; in slab construction, this means the trap is set in concrete during the initial pour.
The drain’s height during rough-in must account for the finished floor thickness. If you’re using a mud-bed shower floor with tile, that’s typically 2 to 3 inches of build-up above the structural slab or subfloor. The drain body must be set low enough to be flush with—not above—the finished tile surface.
Rough-in dimensions and valve placement
Plumbing shower rough-in places the hot and cold supply lines at the wall where the valve will be installed. Standard shower valve rough-in height is 48 inches from the finished floor to the center of the valve—comfortable for most adults when standing. Adjust this down to 40–42 inches for children’s bathrooms or up to 54 inches for taller users.
The rough-in opening for a standard single-lever pressure-balancing valve is typically 1/2-inch copper or PEX supply lines positioned at the spacing specified by the valve manufacturer—usually 3.5 to 4 inches apart. Check the valve’s installation instructions before roughing in, since spacing varies between brands.
Blocking must be installed in the wall cavity at the valve location before drywall or backer board goes up. The valve body needs solid support—a piece of 2×8 or 2×10 blocking nailed between studs at the correct height provides a secure anchor for the valve trim and body.
Plumbing trim: valves and fixtures
Plumbing trim refers to the visible components installed after tile work is complete: the valve trim plate and handle, the showerhead, and any diverter controls. Trim kits are designed to fit specific valve bodies—you can’t mix trim from different manufacturers in most cases.
Pressure-balancing valves (required by code in shower applications in most U.S. jurisdictions) maintain a consistent water temperature when toilet flushes or other fixtures draw cold water. Thermostatic valves are an upgrade that maintains temperature independently of flow rate, which is useful in multi-outlet shower systems.
When selecting plumbing trim, confirm the valve body is already installed and roughed in—some homeowners discover too late that the trim they want requires a different valve body than what’s in the wall.
DIY outdoor shower plumbing
A DIY outdoor shower plumbing project can range from a simple cold-water garden shower to a fully plumbed hot-and-cold outdoor bathroom. For a basic setup:
- Run a 3/4-inch supply line from the house to the shower location. Use PEX for underground runs—it’s flexible and freeze-resistant compared to copper or CPVC.
- Install a shutoff valve before the outdoor shower so you can isolate and drain the line in winter climates.
- Use a standard outdoor shower valve (often a single-handle unit designed for wall or post mounting) with a 1/2-inch supply connection.
- Drain can be a simple gravel pit at 2–3 feet depth, lined with landscaping fabric to prevent silting. In areas with clay soil or where runoff control is required, a pipe drain to a dry well or municipal stormwater system is better.
For hot-and-cold outdoor showers, run a hot supply line as well. Insulate both lines underground if you’re in a cold climate. The most reliable approach is to run lines inside an insulated conduit and install an inline mixing valve near the shower location.
Code considerations and tips
Shower plumbing in the United States must comply with the International Plumbing Code (IPC) or the Uniform Plumbing Code (UPC) depending on jurisdiction. Key requirements include: pressure-balancing or thermostatic valves on all shower outlets; minimum 30×30 inch shower floor area; compliant drain and trap sizing; and proper venting of drain lines to prevent siphoning of P-traps.
Pro tips recap: Set shower drain height based on finished floor thickness, not subfloor. Install blocking at valve locations before closing walls. Match trim to the valve body already installed. For outdoor showers in cold climates, include a drain-back capability on all supply lines so they can be fully emptied before freezing weather.