How to Tape and Mud Drywall: Complete Guide to Mudding Drywall
Learning how to tape and mud drywall is one of the most rewarding DIY skills you can develop. The process turns raw gypsum board into a smooth, paint-ready surface. Mudding drywall involves three distinct coats applied over several days, each serving a different purpose in building a flat, seamless wall.
This guide walks you through exactly what tools and materials you need for taping and mudding drywall, how to execute each coat, common errors to avoid when mudding and taping drywall, and how to finish the surface for paint. Mastering how to mud drywall seams correctly from the first coat means less sanding and a better final result.
Tools and Materials for Taping and Mudding Drywall
Before starting, gather your tools and mix your compound to the right consistency. You will need:
- Joint compound: All-purpose compound for general use; lightweight compound for finish coats
- Paper tape or mesh tape: Paper tape is preferred for flat seams; mesh tape is easier for beginners
- 6-inch and 10 or 12-inch drywall knives: Use the 6-inch for the first coat; the wider knife for subsequent coats to feather the edges
- Corner bead: Metal or vinyl beading for all outside corners
- Mud pan: For loading your knives cleanly
- Sanding pole with 120-grit sanding screen
Compound consistency should resemble mayonnaise — smooth, creamy, and spreadable without being soupy. Too thick and it tears the tape; too thin and it will not fill properly.
Step-by-Step: How to Mud Drywall Seams
The three-coat process for mudding and taping drywall seams follows a logical progression:
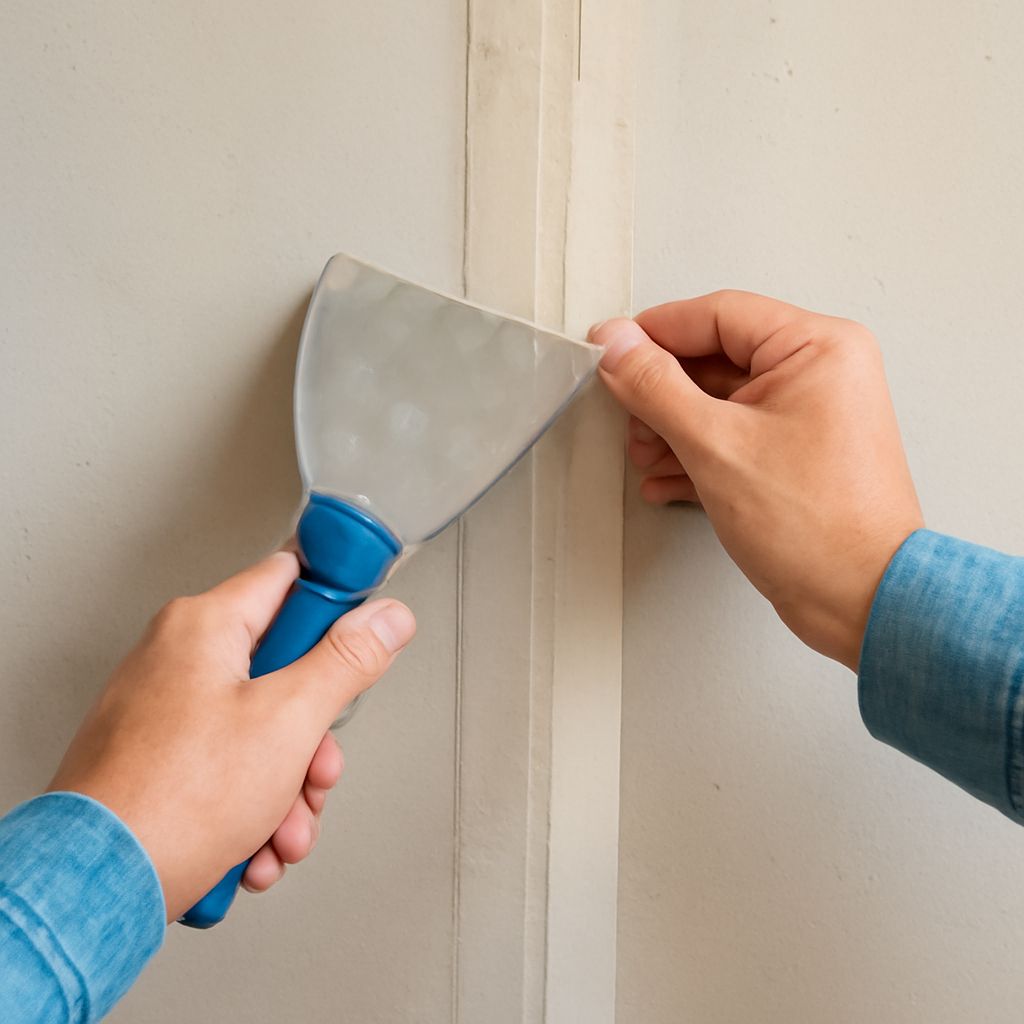
- First coat (embed coat): Apply a thin layer of compound over the seam with your 6-inch knife. Immediately press paper tape into the wet mud, centered on the joint. Run your knife over the tape firmly to embed it and squeeze out air bubbles. Feather the edges. Let dry completely — 24 hours minimum.
- Second coat (fill coat): Sand any high spots lightly. Apply a wider layer of compound using the 10 or 12-inch knife, extending 4 to 6 inches beyond the tape on each side. Feather the outer edges thin so there is no ridgeline. Allow to dry completely.
- Third coat (finish coat): Apply the thinnest coat, blending 8 to 12 inches from center. Use lightweight compound for easier sanding. The goal is to make the seam area perfectly level with the surrounding panel surface.
Common Mudding Drywall Mistakes and How to Avoid Them
The biggest error in mudding drywall is rushing between coats. Applying the second coat before the first is completely dry causes shrinkage cracks and ridging. Touch the compound — it should feel cool but not cold when fully dry. Watch for color change from dark gray-brown to uniform white across the entire surface.
Applying compound too thick in a single coat is another common issue. Thick coats take longer to dry, crack more easily, and are harder to sand smooth. Multiple thin coats consistently outperform one heavy application. Keep each coat to no more than 1/8 inch thickness.
Not feathering the edges wide enough leaves a detectable ridge under paint. Use the widest knife you have for each successive coat, and draw the blade at a shallow angle to thin the compound progressively toward zero at the outer edge.
Finishing Touches After Taping and Mudding Drywall
After the final coat dries, lightly sand the entire taped area with 120-grit mesh on a pole sander. Wipe the surface with a barely damp sponge to remove dust without rewetting the compound. Prime the walls before painting — drywall primer seals the paper face and compound uniformly, preventing patchy results when paint is applied directly to raw compound.
Inspect your finished walls under a raking light to reveal any remaining ridges or depressions. Touch up with a final skim coat where needed, allow to dry, sand lightly, and prime again before your finish paint.
Key takeaways: Successful drywall mudding depends on thin coats, complete drying between stages, and increasingly wide feathering. Do not skip the primer — it is the step that makes paint results look professional. For large commercial-scale drywall projects or veneer plaster applications, consult a licensed drywall finisher.