Drywall Lift: Types, Features, and How to Use One Safely
A drywall lift turns ceiling panel installation from a two- or three-person job into something one person can handle with far less physical strain. Drywall lifts are mechanical panel hoists that raise full sheets to ceiling height and hold them in position while you drive screws. If you’ve ever tried to hang ceiling drywall without one, you understand why a drywall holder that keeps the panel overhead without constant hand pressure changes the whole job. This guide explains the main lift types, what to look for when renting or buying, and how to use one safely.
Whether you’re looking at drywall lifts for a single-room project or planning a full basement ceiling, understanding the difference between a standard drywall lifter and a unit built for higher ceilings or heavier panels helps you pick the right tool. And knowing how a drywall stand fits into the process, where it’s useful as a staging support, completes the picture for planning a smooth installation day.
Types of Drywall Lifts
Standard Panel Lifts
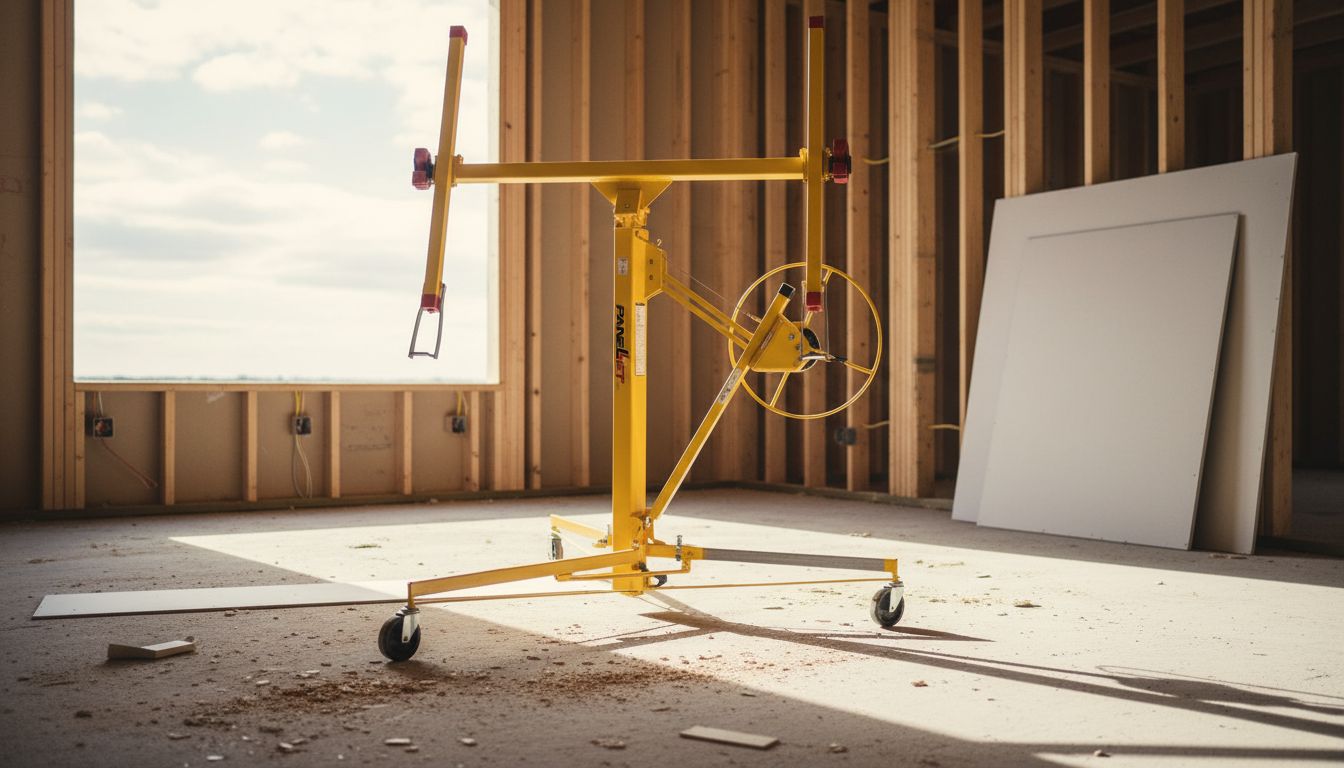
A standard drywall lift handles sheets up to 4×12 or 4×16 feet and lifts to 11 feet in most models. The mechanism is a threaded rod driven by a hand crank or a cordless drill adapter. You load the panel horizontally on the lift tray at floor level, crank it up to ceiling height, then tilt the tray to press the panel flat against the framing. Most residential ceiling jobs fall within these specs.
These lifts roll on wheels and typically break down for transport through doorways. The wheel locks are worth checking before you start; a lift that rolls while you’re driving screws overhead is a hazard. Quality drywall lifts have positive-locking casters on all four legs.
Extended-Height and Heavy-Duty Lifters
For vaulted ceilings, commercial spaces, or panels heavier than standard 1/2-inch drywall, extended-height drywall lifters reach 15 feet or more and are rated for heavier loads. These are less common in rental centers but available through specialty tool suppliers. If you’re working with 5/8-inch type-X drywall (common in garages and fire-rated assemblies), verify the lift’s rated capacity before loading it.
Key Features to Evaluate
Crank Mechanism and Load Capacity
The crank on a drywall lift should move smoothly throughout the full range of travel. Cheap lifts with rough cranks or binding mechanisms create problems at the worst moment, when you have a 60-pound panel overhead. Better models include a drill adapter that lets you drive the lift with a cordless drill instead of hand-cranking, which saves a lot of effort on multi-panel days.
Load capacity matters more than most buyers check. Standard sheets of 1/2-inch drywall weigh about 54 pounds for a 4×8 and 68 pounds for a 4×10. A 4×12 sheet of 5/8-inch drywall can top 100 pounds. Using a drywall lifter at or beyond its rated capacity stresses the mechanism and creates genuine safety risk.
Tray Tilt and Panel Positioning
Once the panel reaches ceiling height, the tray tilts to press the sheet flat against the framing. The quality of this tilt mechanism determines how precisely you can position the panel. Look for a model where the tilt adjustment is smooth and holds its angle without drifting. A drifting tray means the panel moves while you’re fastening it.
Using a Drywall Stand for Staging
A drywall stand is a separate, simpler tool that holds panels upright on the floor for cutting or staging. It’s not a lift, but it works alongside a lift to keep panels organized and off the floor during a long installation day. Most consist of a pair of padded brackets that clamp onto sawhorses or a dedicated base. If you’re managing multiple panels in a tight space, a drywall holder in stand form keeps the work area safer.
Safety Rules for Drywall Lift Use
Load the panel only when the tray is at the lowest position. Never walk under a lifted panel. Keep the work area clear of other people while the panel is elevated. Use the positive-locking casters throughout the lift and positioning process. If the mechanism feels sticky or the lift doesn’t hold position smoothly, lower the panel immediately and check the equipment before continuing.
When working solo with a drywall lifter, pre-drive a few screws into the panel before raising it, so you can fasten quickly once it’s in position. Mark your joist locations on the wall before starting so you know exactly where to drive fasteners without fumbling overhead.
Pro tips recap: Verify load capacity before using any drywall lift with heavier panels. Check caster locks before cranking a panel up. Use a drill adapter if available to reduce fatigue. Stage panels with a drywall stand to keep your work area organized. Mark joists on the wall first so you can fasten without hesitation once the panel is in position.