Shower Plumbing Diagram: Understanding Your Bathroom Water System
A shower plumbing diagram is the map you need before opening any wall in a bathroom renovation. It shows where supply lines run, where the drain connects to the main stack, and how the valve body ties into the hot and cold supply. Having a clear bathroom sink plumbing diagram alongside your shower layout helps you plan rough-in work without surprises. Bathtub plumbing follows slightly different rough-in dimensions than a shower stall, and a tub plumbing diagram makes those differences immediately clear. Understanding your full bathroom plumbing layout lets you make smarter decisions about what to move and what to leave where it is.
Reading a Shower Plumbing Diagram
Supply Lines vs Drain Lines
Supply lines carry pressurized hot and cold water to the shower valve. They’re typically 1/2-inch copper, CPVC, or PEX running inside the wall from the main distribution lines. Drain lines are larger — 2-inch minimum for a shower — and run at a slope toward the main drain stack or a branch drain. In a plumbing schematic for a shower, supply lines are usually shown as thinner lines and drain lines as heavier ones with slope arrows indicating flow direction.
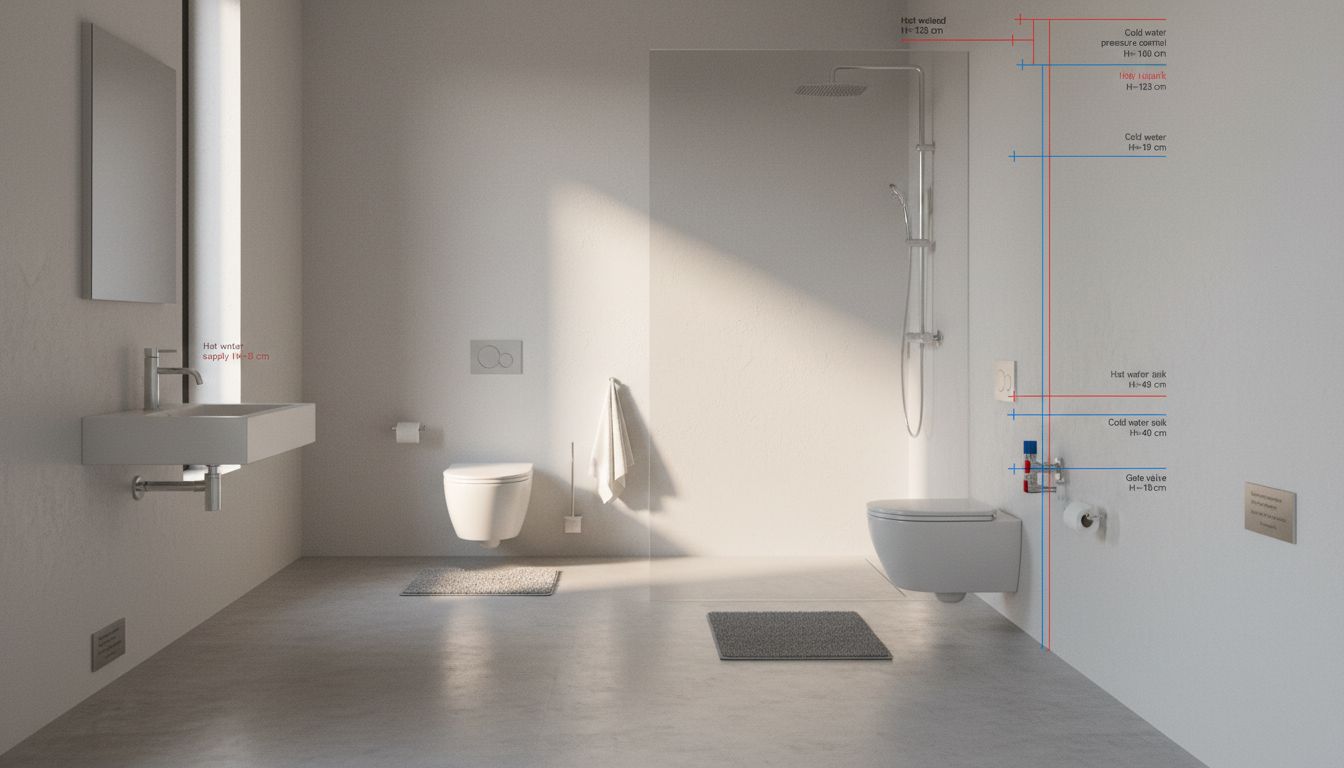
When reading shower rough-in drawings, the valve centerline height matters. Standard shower valve rough-in is 48 inches above the finished floor for a separate shower, though it varies by fixture manufacturer. Your shower valve’s installation sheet includes the exact rough-in dimensions — use those numbers, not general guidelines.
Valve and Trap Placement
The shower drain trap sits below the finished floor, typically between 4 and 6 inches below the drain opening. The trap must be accessible, which is why basement ceilings below ground-floor showers often have an access panel. In an upstairs bathroom shower, the trap rough-in is inside the floor framing, and getting it right before the subfloor closes is the most critical timing issue in the whole project.
Bathroom Sink Plumbing Diagram Basics
A bathroom sink plumbing layout shows the hot and cold supply stub-outs coming up through the cabinet floor, the P-trap beneath the drain, and the drain arm connecting to the wall drain. Standard rough-in for a bathroom vanity sink is 21 inches above the floor for the drain connection and 19 to 21 inches for supply line stub-outs, though pedestal sinks may vary slightly.
When you’re reading a bathroom sink rough-in diagram alongside a shower layout, you’re planning how both drains tie into the same branch line running toward the stack. Keeping these drains close together reduces the amount of horizontal run needed, which simplifies venting requirements.
Bathtub Plumbing and Tub Drain Rough-In
Standard Rough-In Dimensions
Bathtub plumbing rough-in locates the drain at a specific distance from the wall, typically 14 to 16 inches from the head wall. The overflow is positioned 16 to 18 inches above the drain center. Supply lines for a tub/shower combo valve come in at 28 to 30 inches above the floor for the valve center. These are standard industry ranges — always confirm with the specific tub manufacturer’s installation guide before cutting.
Overflow and Drain Assembly
The tub drain connects to an overflow tube that runs inside the tub apron. The overflow prevents flooding if the tub fills past the normal level. In a tub plumbing schematic, you’ll see the drain, the overflow fitting, and the waste-and-overflow assembly that connects them to the trap below. Bathtub drain assemblies are available in push-pull, trip-lever, and toe-tap styles, but the rough-in plumbing is the same regardless of which style you choose.
Full Bathroom Plumbing Layout Planning
Before any renovation, sketch a full bathroom plumbing layout showing every fixture’s supply and drain connection. Mark the location of the main stack, the direction of floor joists (which affects where you can run drain lines), and the positions of any existing wet walls. This drawing becomes the planning document for your contractor and the permit office.
Moving the toilet in a bathroom layout renovation costs the most because the 3-inch closet drain needs slope and ties directly into the main stack. Sinks and showers are more flexible. In most cases, keeping the toilet where it is and redesigning the layout around it saves significant plumbing cost.
Next steps: If you’re planning a bathroom renovation, pull the permit early and have the inspector sign off on your rough-in before closing walls. Rough-in inspections catch problems that would otherwise be buried in your walls for decades. Getting the plumbing diagram approved before you tile saves you from ever having to tear tile out to access a drain connection.